Wednesday, March 4, 2020

My Career is NOT a Side Hustle!

Becoming a Professional Makeup Artist is not something that many of us take lightly. Many of us in the industry have invested thousands of dollars in products, tools and training to better ourselves as artists. So excuse us if we take offense to our career choice being referred to as a "side hustle" option for people. This is actually becoming the norm for a lot of entrepreneurial trades. People see many of us after the years of struggles and only see our success. They then say "I can do that too". I hate to be the one to break it to you, but it really doesn't truly work that way. Far too often we have people that are operating completely outside of their gifts and their purpose. Understand that we ALL have a gift and a purpose that God has placed within us. Just because you do makeup good on yourself or you might love playing in makeup does NOT mean you should be a makeup artist. I absolutely love to dance, but you don't see me out here auditioning to be someone's backup dancer either. We need to stop telling our friends to quit their jobs to pursue something that they're not even meant to do. We also need to stop encouraging them to jump into an industry as a side hustle when you know they aren't serious about it. If it's that they just want to make a few extra dollars then tell them to go drive for Uber or go be a waitress or something else.

Wednesday, April 11, 2018

Selecting a Makeup Artist for your Wedding Day


A bride’s wedding day will be one of the most memorable days of her life. There is so much that has to be done prior to the ceremony in order for a smooth ceremony. A location must be chosen, dress selected, menu items and cake chosen. You will also need to decide on a makeup artist and schedule a bridal trial. Contrary to popular belief, selecting your makeup artist should be done no less than six months prior to the wedding date. If you wait too late, you risk the possibility of being unable to book the artist that you want. You might even be stuck without an artist at all depending on the area and demand during that time of year. You should make it a priority to do your homework when picking an artist. Check out their social media platforms, websites to see their portfolios and read any reviews from previous clients (especially brides). All artists have their own unique style. It is your job as the bride to make sure that you choose an artist who will be able to bring the vision for your big day to life. You do not want to pick someone who is unable to achieve the look that you are going for, or who does not seem to have the skills required for what you would like done. Many people will try to convince you that a bridal trial is a waste of time. I believe that it is an extremely critical portion of the process to help you select a makeup artist.


1. Most of the time people book artists that they have never met. The trial will give you and your bridal party the chance to meet the artist before your big day. Be sure that you select someone who is professional, relatable and who has the knowledge and skill to assist in making you and your ladies look beautiful for the ceremony and photographs.
 
2. This gives you the chance to speak with the artist about your vision for the ceremony. It is best to try and make this appointment 3-4 months in advance at minimum. In case you may not be satisfied with an artist, you may want to book more than one trial with a few artists. This will give you enough time to make adjustments if needed.
 
WHAT YOU SHOULD KNOW: 
 
* Come to the trial with a clean face and all unwanted hair removed. The makeup artist will do a skin consultation to determine what makeup best suits you. Please make sure that if you do not arrive at the appointment with freshly waxed skin.  
 
* Bring pictures of various makeup looks to the bridal trial. This will help the makeup artist to understand your concept and be able to bring it to fruition. 
 
* Lashes are not a required item during application. However, I would highly recommend that you would have the artist to use lashes. This will help in making the overall look really pop.  
 
* Royal Blue Artistry offers personalized touch-up bags so that each lady will have access to their specific lip color and blotting papers during the wedding day.  
 
* You will be provided pictures of the finished look upon completion of the appointment. This is to give you a general idea of how your makeup will come out on camera.  

Wednesday, March 21, 2018

Bye Bye Pesky Pores: 7 Top Recommended Pore Minimizing Primers

Don't you just hate when you have taken your time to create what you imagined to be a flawless makeup look, only to look and see your pores staring back at you? That has to be the absolute worst feeling ever. You become inspired, you lay out your products and you say to yourself "I'm about to kill 'em with this look right here". Well let me ask you this....are you using a pore minimizing primer before you apply your makeup? If not, then maybe this is a good time for you to invest in one.

There are many primers that are on the market that you could purchase. However, not all of them are great for making your pores look smaller if this is a major issue for you. A primer is technically used as a barrier between your face and your foundation or BB cream. The purpose of it is to smooth and prepare your skin for the product. It also helps to give the product something to hold on to throughout the day as you wear it. What the primer you purchase does will depend on it's particular formula. So, if you want one specifically to target large pores you are going to have to do some research. But wait, don't worry....I've done it for you already.

Let's face it, we ALL have pores. But we never want them to be the focal point of our makeup. So these are some of the most recommended primers to help with those pesky little buggers. I hope that this will help you along the way.


Benefit: The Porefessional Face Primer


Smashbox Photo Finish Pore Minimizing Primer


E.L.F. Poreless Face Primer


Too Faced Primed & Poreless Skin Smoothing Face Primer

Tarte Clean Slate Poreless Primer


Dr. Brandt Pores No More Pore Refiner Primer


REVLON Photoready Color Correcting Primer


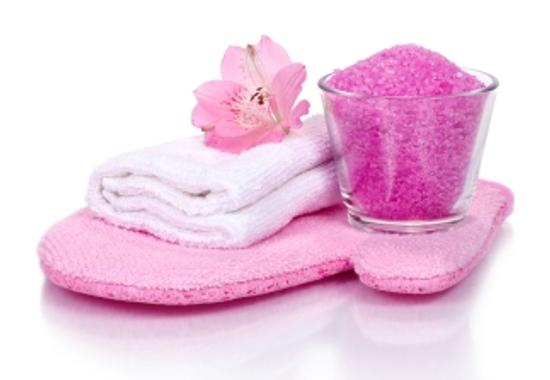
Sunday, March 4, 2018

The Amazing Benefits of Water for Your Skin


There are many people that do not drink the recommended amount of water daily. Some don't drink any water at all. This is probably the worst thing that you could do to your skin. Your skin is filled with cells that need water to function. When you do not properly hydrate these cells it can cause you to appear older than what you are.


Increased natural mineral water intake has been proven to benefit people with dry skin. It helps to improve the overall moisture of the skin. It also helps with the increase of softness and smoothness as well. There have been no studies to prove that water intake reduces wrinkles. It can be said that an adequate amount of water can help make the skin more elastic, resilient and plump. This may help reduce the appearance of wrinkles and make pores look smaller.


There are several reasons why having an adequate daily intake of water helps prevent blemishes. Well hydrated skin may decrease concentrated amounts of oil on the skin, keeping a balance of oil and water, which can reduce breakouts and blemishes.


Celebrities would suggest drinking some water—they seem to all claim it’s the secret behind their supple, glowing, always camera-ready skin. Ellen Pompeo drinks water for her skin’s sake. Jennifer Aniston says drinking “lots of water” keeps her looking ageless. And Gabrielle Union has been putting away a gallon a day of H2O since her mid-30s. You have to admit that they all look pretty amazing.


Most people that usually complain about acne do not drink enough water. It is critical to have a stable balance of water to oil on the surface of skin. If the skin is too heavily covered in oil relative to water, this can lead to clogged pores with acne breakouts and blemishes.


I know that from personal experience, I have only ever experienced issues with my skin when I was dehydrated. Majority of the time my skin looks great. I have always been told that there is no way that I eat junk food or drink soda because my skin has always been so clear. I quickly let people know that I do partake in those items. However, I drink at least a gallon of water daily so that is what helps me to maintain that glow that I have. That along with a regular skin care regime are key to keeping your skin looking youthful.


Do not think that because you are drinking more water that you can skip out on moisturizing your skin. You should make sure that your skin is being is well taken care of. The water that you drink may not have any effect on your most outer layer of skin that may be dried out from cleansers and exfoliates. Moisturizing your skin both inside and out is a critical combination for healthy, beautiful skin.


Sunday, February 11, 2018

Spring Skincare Exposed

As we transition from Winter to Spring and prepare for the warm weather, it is extremely important to remember our skin.  In case you were unaware there is a special process called exfoliation that is used to rejuvenate your winter-weary body.  Exfoliation removes dead skin cells, leaving your skin smooth and radiant.  Many women always remember to exfoliate their faces, but often leave out the rest of their body.  No part of the body should be neglected, especially if you intend on using tanning products or just want your skin to have that gorgeous glow.


Let us first begin with a list of products that you can use to help you shed those unwanted skin cells from the winter.  Face scrubs are great because they help to eliminate any excess skin that you have resting on your face.  Just remember not to over-exfoliate, this could cause your skin to be super sensitive later on.  One of my favorites is Ponds Fresh Start Daily Exfoliating Cleanser.  I have been using this particular one for over six years and I love the way that it rids my face of any impurities that I am unable to remove with my daily cleanser.  It contains micro beads, white tea and china clay, which I have found to work wonders on my skin.  When I first started out, I used the Apricot Scrub:  Blemish and Blackhead Control.  It is an amazing product to use, so if you have not tried It I would suggest both of these as facial scrubs.

At least once a week, you want to do a deep cleansing on your face by using a mask.  I personally use Oil of Olay Clay Deep Cleansing Mask or Freeman Clay Mask to get the job done.  Both are really great products and leave your skin feeling revived and ready to face a new week.

One thing that I hate to see is someone that has gorgeous skin, but dry cracked lips.  So loves please do not forget to take care of those lips too.  There are many different brands who produce lip exfoliates.  For example, Mary Kay has Satin Lips and Victoria’s Secret has Smooth FX Lip scrub & Balm.  So take advantage of what is out there for you.  If you are afraid you can’t afford to purchase one of these, then just make your own.  Take some salt, white sugar and mix it with some Vaseline.  Apply it to your lips and gently rub the excess skin off.  Apply a moisturizing lip balm and there you have it.
Now that you have done your face and your lips, you have to take care of the rest of your body.  You should invest in the necessary tools that are made in order to help with the exfoliation process.  For your body, they make items such as exfoliating gloves, loofah sponges, and body brushes.  You can also purchase pumice stones for your feet.  These things come in handy and make everything a whole lot easier.  Prior to entering the shower you should take one of these items and brush your dry skin.  This helps to remove any loose skin that you may have on your body before you begin.  Start at the soles of your feet and work your way up your entire body.   If you have extremely rough feet, try soaking them in a basin of water mixed with a cup of milk for about 30 minutes before you get into the shower.  Use the pumice stone along with a good foot scrub to eliminate the rough spots and calluses on your feet.  I tend to use Freeman Bare Foot Scrub.   
Apply a body scrub of your choice to your gloves or loofah  and begin rubbing in circular motions, working your way up from your feet.  Be careful not to rub hard once you get to your bikini area, the skin here is very sensitive.   If you are like me then you probably have issues reaching your entire back.  No need to worry that is why they invented body brushes.  Invest and use them wisely, you only get one body.   Before you rinse, make sure that you take the time to get those precious hands.  You can either use the body scrub that you used on the rest of your body.  Or you could try a product like Mary Kay’s Satin Hands.  I happen to love it and it makes your hands feel so soft afterwards.  Once you complete this process rinse in lukewarm water, follow that up with the coldest water you can possibly stand.  You can apply a shower gel to soften your skin after if you would like to.  


Ok you are almost ready to do your spring reveal of your gorgeous skin, just one more step to take.  Moisturize, moisturize, moisturize and moisturize!!!!!  Don’t you dare take all of that time to shed that dead skin and forget to put moisture back into it.  Although exfoliating is good for the skin, it is very drying.  I would hate for you to go out and think that your skin looks lovely and turns out you are looking like Mr. Brown about the kneecaps.   There are many types of products to help you accomplish this, for all different skin types.  You can use one specifically for your face and one just for your body.  Or you can purchase one to use on both.  There are different moisturizers for all skin types so there is no need to worry.  Most of the products made for exfoliating will say daily use on them, but I wouldn’t recommend to do so.  Because they contain micro beads and could potentially cause damage to the skin from overuse, I would say use them two or three times in a week.  You are now ready to expose your Spring Skin!

Thursday, February 1, 2018

BRUSHES FOR BEGINNERS

Greetings my loves! I have gotten asked a lot in the past by different people what types of brushes do I use, and what are the basic brushes to create a flawless makeup look. I will start off by letting you know that when it comes to makeup brushes, quality is everything. You want to invest in brushes that will last and that will not take away from what you are doing. I have a few different brands for my own personal use (Mehron, BH Cosmetics and Real Techniques). As far as my kit for my clients, I am currently using Sigma, Real Techniques, Morphe, and Elf. I get a lot of compliments on how soft my brushes are on their faces and how they rarely shed. I am not telling you that you have to run out and get these particular brands, but they are good quality and affordable in my opinion. As far as other brands there are Crown, Royal Care Cosmetics, Bdellium Tools, and MAC to name a few. It all depends on what your preference is and what your budget will allow you to support. Now let's get down to the types of brushes that are essential for every beginner.


  1. For foundation application I love to use a Duo Fiber brush, the Elf flat top powder brush or a beauty blender. If you are looking for a more airbrushed look, I would suggest the Duo Fiber brush or beauty blender. I know that the blender is not a brush, but it is an excellent tool for applying foundation
  2. To groom your brows and blend them properly if you fill them in, you will need to invest in a brow brush. These can be picked up at a local beauty supply store or come with a basic brush set. The brush side should be used on brows, while the comb side should be used on the lashes after mascara application to avoid clumping and to help them spread out more.
  3. In order to apply your eyeshadow in the most effective way, I would suggest getting a good flat shadow brush. I do not like the way it looks when shadow is applied with sponge tip applicators, but that is just my opinion. Just be mindful about how much product that you pick up on the brush or applicator to avoid a lot of fallout in the under eye area.
  4. After you apply your shadow, you will need to blend it out to avoid having harsh lines of where the different colors were applied. In order to do this you will need a good blending brush. There are two different types that you can get. You have a basic blending brush and then you have the more fluffy blending brush which allows you to be able to achieve a more airbrushed finish to your eye makeup.
  5. A good powder brush or blush brush is definitely a must. These can be used to set your overall look with a good powder or to add a pop of color to your face with some blush.
  6. For those dark under eye circles, scarring or even to define a brow there is definitely the need for a good concealer brush. It is a must have and in my opinion a life saver. 
  7. A small powder brush should be used to achieve the subtle highlight on the cheekbones. The smaller brush works better because it allows you the ability to concentrate the product exactly where it should go. A good thing to remember about brushes is the more compact and sturdy the brush is, the more control you have to focus the application of your product to a certain place.
  8. Everyone wants the perfect winged liner on their lids. If you have a hard time attempting this with the products that come with the small, flimsy brushes then consider purchasing an eyeliner brush. It will give you the ability to have more control over the line you are creating, and you will love the results I'm sure of it. You can choose to go with the angled brush or the pointed brush. Either of them work well, it just depends on what your preference is.
There are other types of brushes out there that you can get, but I am simply listing the ones that I believe are truly essential for anyone just starting out. It all depends on the individual at the end of the day. I hope that this has been helpful for all of those seeking guidance in the direction of what to purchase. Remember to do your research on companies, different brush types and their uses. There are plenty of reviews out there that you can find to help you during this process as well. Just don't go and get a certain brush because someone said you should. They may think it's great, but you might not like it at all. Just because one person loves an item does not mean the next one will.

Friday, February 24, 2012

Black Opal Invisible Oil Blocking Loose Powder

I finally found a product that everyone has been raving about for a while.  Well at least those of us with oily skin, or who service clients that have oily skin.  Personally, I have problems in my T-zone (forehead and nose to include the bridge) with being oily.  Even when I don't wear any makeup at all, I look shiny there.  I've tried a few primers for a Matte look, and even the foundations that are made specifically for oil/combination skin.  I just never found one that really did what it actually claimed.  Then I heard about this powder by Black Opal.  I have been looking for this product for a few months with no success.  On a trip home, I stopped by CVS and I was amazed that they had it.  The thing that's great about it is that it comes in loose and pressed form.  The cost is only about $9, you can't beat that at all.  Now when I first heard about this powder, I was told that you could put it on either before or after makeup application and it works well.  But, I've even been told that it worked even better if you did both before and after.  So I decided to try it both ways, and the results were awesome!  I applied my makeup for a wedding reception at about 2pm and did not get home until well after 10pm.  The picture I included of my makeup was taken around 1030pm.  This was after a night of dancing and celebrating with friends.  Let me tell you that my usually super oily areas were almost nonexistent.  Don't get confused and think that any product will totally strip the oils completely.  The idea is to minimize it as much as possible, and this product does just that.  I love it so much, I went back and purchased another jar of the loose powder.  I had to, just in case I can't find it in my area. 


Published with Blogger-droid v2.0.4